

When a back “setback” wipes out your week
Every patient in my clinic with a history of low back pain knows the pattern. You are functional for weeks or months. Then something small — a long flight, a heavier suitcase, a weekend of yard work, a poorly-timed sneeze — and suddenly you can barely sit at your desk, sleep on your side, or bend to tie a shoe. The pain is not new. What is new is that it is disabling, and for reasons no one has ever satisfactorily explained to you, it lasts three days for some flares and three weeks for others.
I would always rather see you in person during one of these setbacks. So would any good physical therapist. But real life is imperfect: you flare on a Friday night, you fly out on Monday, your PT is booked out two weeks, my next opening is Thursday. Meanwhile, you are lying on the floor Googling “lower back pain what to do” and finding a swamp of contradictory advice.
This article is the bridge I want my patients to have between the setback and their next visit. It draws heavily on the work of Stuart McGill, PhD — professor emeritus of spine biomechanics at the University of Waterloo and, in my opinion, the most important clinical thinker in low back pain of the last thirty years. His book Back Mechanic is the single resource I recommend most often to patients who want to understand their own spine and take intelligent charge of their flare-ups. What follows is a physician’s summary of how I actually use his framework with patients, what it can and cannot do, and how to get the most out of it as a home program.
The clinical logic in one paragraph
McGill’s central insight is deceptively simple, and I think it is correct: most non-specific low back pain is mechanically provoked by a specific, identifiable set of motions, postures, or loads that are unique to that person. A patient whose disc is sensitive to flexion (bending forward) will hurt more sitting, tying shoes, or reaching down to load a dishwasher. A patient whose facet joints are sensitive to extension (bending backward) will hurt more standing for long periods, lying prone, or reaching overhead. A patient with shear-sensitive pain will hurt more with rotational loading and sudden twists. Until you know which pattern you are, general “back exercises” are a coin flip — some will help, some will make you worse. The Back Mechanic framework is a way to find your specific pattern, systematically remove the movements that provoke it, and then rebuild capacity around a spine that can stay in its neutral, load-tolerant position under real-world stress. If you want the source material in the author’s own words, this OTP Books essay by Dr. McGill is a good starting point, and Back Mechanic itself is the full self-directed workbook.
What this framework is (and honestly, what it isn’t)
What it is: a structured, evidence-informed self-assessment and daily home program for uncomplicated mechanical low back pain. It is not a fringe or an alternative-medicine approach; McGill’s core stability work has been reproduced across dozens of laboratory and clinical studies since the mid-1990s, and the Big 3 exercises are the closest thing spinal rehabilitation has to a widely-agreed-upon “always safe, usually helpful” daily program.
What it is not: a diagnosis, a substitute for imaging when imaging is indicated, or a treatment plan for red-flag back pain. Before you self-manage a flare with any home program — McGill’s or anyone else’s — you need to be reasonably confident this is a mechanical flare and not something else. If any of the following are present, stop reading this and contact your physician (or an emergency department) today:
- New weakness in one or both legs, or a foot that catches or drops when you walk
- New numbness in the groin or perineum (“saddle” area), or new loss of bladder or bowel control — a possible cauda equina emergency
- Unexplained fever, chills, or night sweats accompanying the back pain
- Significant unexplained weight loss, a history of cancer, or a history of injection drug use or immunosuppression
- Pain that is dramatically worse at night or that wakes you consistently from a deep sleep, unrelated to position
- Back pain following a significant fall, motor vehicle accident, or direct trauma
None of the following applies to those situations. What follows is for the far more common scenario — the recurrent mechanical flare in a patient with an otherwise-known back — where a smart bridge program between now and your appointment is the right call.
Step 1: Find your pain triggers
The most useful hour you can spend during a flare is not stretching. It is quietly, systematically figuring out which specific movements, postures, and loads reproduce your pain, and which ones you tolerate. McGill’s framework calls this provocative self-assessment. It is boring, it feels unproductive, and it is the single highest-yield thing you can do.
Work through the following categories over a couple of sessions and keep a short written list. Two columns: provokes and tolerates.
Flexion vs. extension
- Flexion: Slowly bend forward as if to touch your toes. Sit slouched on a soft couch for 60 seconds. Round your back gently while seated. Notice: does the low back pain increase, radiate, or start to feel “electric”?
- Extension: Stand tall and gently arch backward. Lie on your stomach and press up onto your elbows (a “prone press-up”) for 30 seconds. Notice: does the pain increase, or does it centralize toward the midline and lessen?
Most patients discover they clearly favor one direction. Flexion-intolerant patients are the majority I see — they hurt more when they bend and sit, and often feel better when they walk or lie prone. Extension-intolerant patients (often patients with spinal stenosis, spondylolisthesis, or severe facet arthritis) usually hurt more when they stand and arch, and feel better when they sit and slightly round forward, like leaning on a shopping cart.
Compression, shear, and rotation
- Compression: Sit upright on a firm chair. Grip the seat of the chair and gently pull upward against your own hands to axially load your spine. Does this reproduce the pain?
- Shear: Reach forward while seated as if picking a light object off a table in front of you. Does the pain increase as you extend your reach forward?
- Rotation: Slowly rotate your trunk left and right while seated, keeping your pelvis still. Any specific direction that provokes the pain?
Postures over time
- How does 30 minutes of sitting affect your pain? 30 minutes of standing?
- How does slow walking on a flat surface for 10 minutes feel? What about a treadmill incline?
- What sleep position provokes the pain versus calms it? (Most flexion-intolerant patients sleep best supine with a small pillow behind the knees, or side-lying with a pillow between the knees to maintain neutral pelvis.)
At the end of this exercise you should have a working portrait of the movements and postures that provoke your pain. That portrait is more diagnostically useful than most MRIs for the purposes of the next 7–14 days. When you finally do see me or your PT, bringing this list in with you cuts our history-taking time in half and makes the treatment plan visibly more specific.
Step 2: Remove the triggers (“Spine Hygiene”)
Once you know your triggers, the next 3–10 days are about religiously avoiding them while your inflamed and irritated tissues calm down. McGill uses the phrase “spine hygiene” for the daily habits that keep an already-irritated back from getting re-irritated a dozen small times per day. Every one of these small hits keeps the pain generator active and delays recovery.
The core principle: hinge at the hip, not at the lumbar spine. Your hips are ball-and-socket joints designed for large-arc motion under load. Your lumbar spine is not. Every time you can transfer motion from your lumbar spine to your hips, you have unloaded the tissues that are actually hurting.
Practical spine hygiene during a flare:
- Getting out of bed: Roll onto your side as a “log” (shoulders and pelvis moving together, no trunk twisting), then push up with your top arm while dropping the legs off the bed as a counterweight. Never sit straight up from supine during a flare.
- Sitting: Use a firm chair, not a soft couch. Keep the pelvis slightly forward of the knees (a small wedge cushion or a rolled towel behind the low back helps). Get up every 20–30 minutes and take a short walk. Long sitting is the single most common flexion-loading trigger for the modern patient.
- Picking anything up off the floor: Use a proper hip hinge or a golfer’s pickup (one leg extending back behind you as a counterweight). Never round your back to lift, even for a sock.
- Tying shoes: Bring the shoe up to your knee, cross-legged in a chair, rather than reaching to the floor. This one small habit change alone helps a large fraction of my flexion-intolerant patients through a flare.
- Reaching into a low car trunk or dishwasher: Split-stance hip hinge with one hand supporting on the car or counter, spine held in neutral. Do not twist and lift.
- Sneezing and coughing: Brace the core and gently stand or lean into a doorframe. A big flexion-loaded sneeze is a classic re-flare trigger.
- Walking: Frequent short walks (10–15 minutes, several times a day) are usually the single best thing a flexion-intolerant back can do during a flare. Walk with a slightly quicker cadence and a natural arm swing, not a plodding shuffle.
- Sleep: For most flexion-intolerant patients, supine with a pillow under the knees or side-lying with a pillow between the knees works best. Firmer mattress usually beats softer during a flare.
None of this is glamorous. All of it works. Patients who commit to spine hygiene for two or three days almost always tell me their pain has dropped one or two points on its own, before they have done a single exercise.
Step 3: The McGill Big 3 — the daily floor
Once your pain has come out of the acute-flare valley — when you can move around your house without being afraid of it — the next step is a small daily practice that builds the endurance of the muscles that keep your spine stable in its neutral, load-tolerant position. Not strength. Not flexibility. Endurance of the stabilizers. This is the distinction McGill has spent his career making, and it is the single most misunderstood point in popular fitness advice about backs.
The Big 3 exercises are three specific movements — one for the anterior core, one for the lateral core, one for the posterior chain — that together train stability without loading the spine into the positions that provoke pain. They are the closest thing to a “universal” back program, and after 40 years of research McGill and his colleagues have written that they consider these three non-negotiable for a healthy back (source).
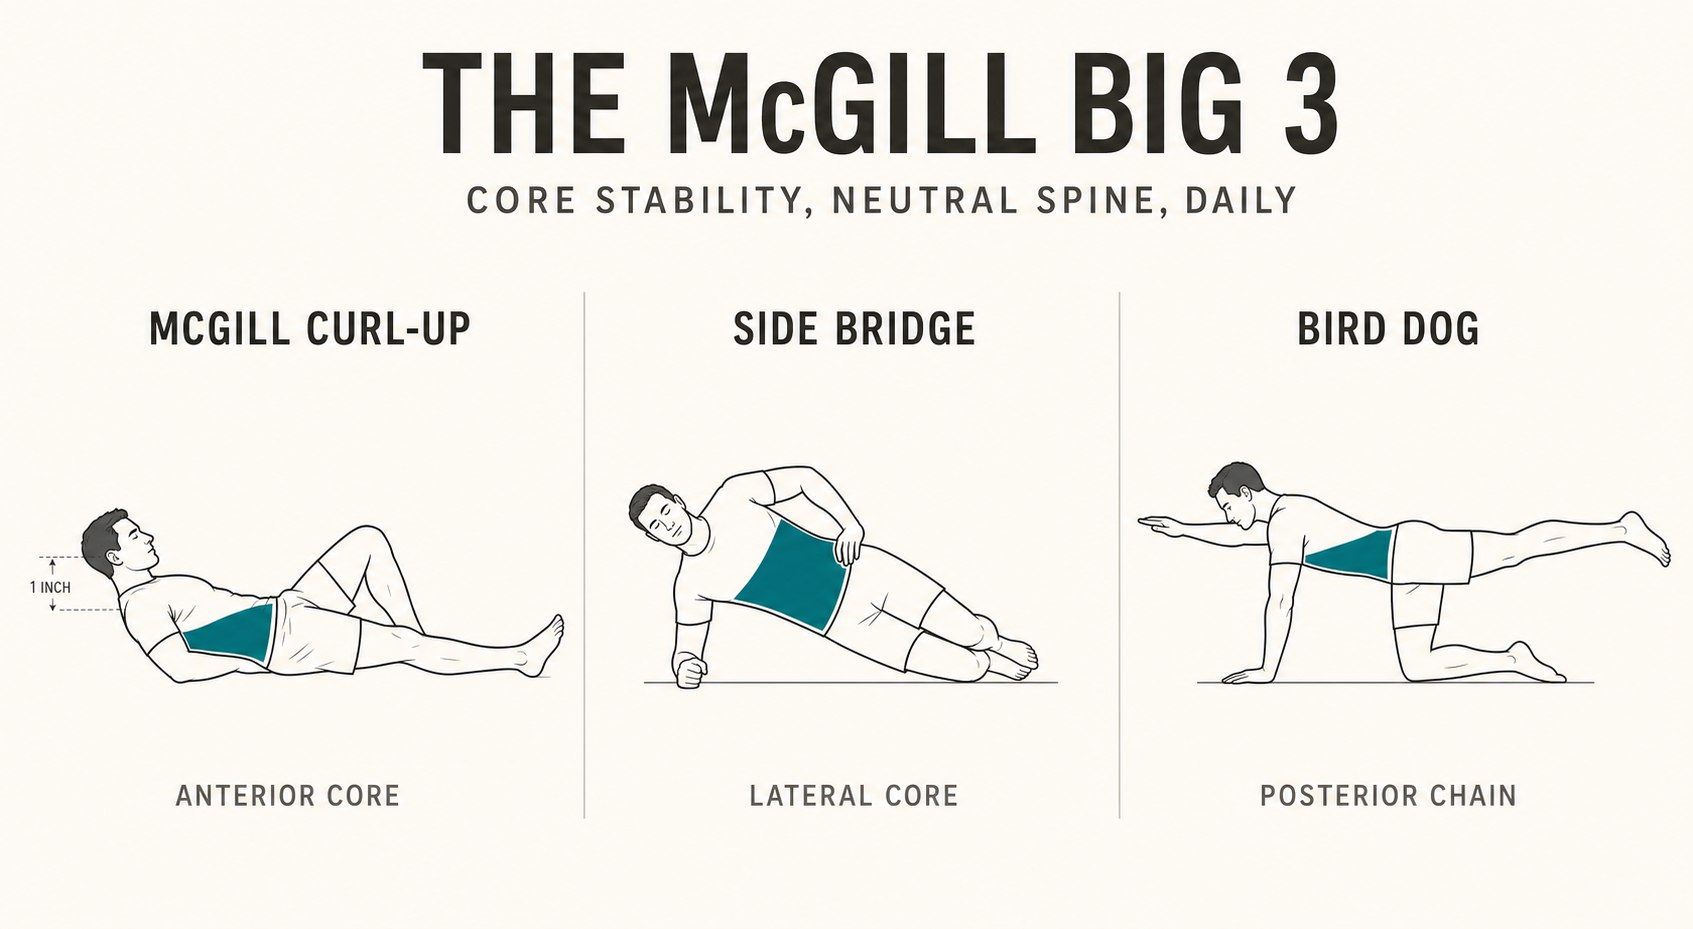
1. The McGill Curl-Up (anterior core)
This is deliberately not a sit-up. Sit-ups load the disc into repeated flexion, exactly the movement most flexion-intolerant patients need to avoid. The McGill Curl-Up trains the anterior abdominal muscles to fire on command around a neutral spine, without moving the lumbar spine at all.
How to perform it: Lie supine on the floor. Bend one knee up and leave the other leg flat and straight. Place both hands palm-down under the small of your lower back — they act as a pressure sensor to warn you if the spine flattens against them (it should not). Brace the core lightly, like you are about to be lightly poked in the stomach. Lift the head and the tops of the shoulders about one inch off the floor as one rigid piece, keeping the chin neutral and the neck relaxed. Hold for 8–10 seconds. Lower under control. Halfway through the set, switch which knee is bent.
Sets and reps: Follow the “reverse pyramid” McGill teaches: 6 holds, then 4 holds, then 2 holds, with a short rest between each set. That’s a total of 12 quality holds, not 100 sloppy crunches. If 8–10 seconds is easy, work toward a full 10-second hold with a perfectly quiet neck and shoulders. The goal is endurance and clean neural firing, not maximum contraction.
2. The Side Bridge (lateral core)
The side bridge trains the quadratus lumborum and the lateral obliques — the muscles that keep the pelvis level and the spine stacked when you are walking, carrying a bag on one side, or standing on one leg. Lateral core endurance is one of the strongest predictors of back health in McGill’s research, and it is the one most people neglect.
How to perform it: Start with the beginner version, which is essential during a flare. Lie on your side with knees bent to about 90 degrees and stacked, forearm flat on the floor, elbow directly under the shoulder. Brace the core and lift the hips off the floor so the trunk forms a rigid straight line from head to knees. Hold for 8–10 seconds. Lower under control. Repeat on the other side.
Progression: When the knees-bent side bridge is easy and pain-free, progress to the classic straight-leg side bridge with feet stacked, hips lifted, and body forming a rigid line from head to feet. Do not progress until the shorter-lever version is clean and easy — there is no rush.
Sets and reps: Same reverse pyramid: 6–4–2 holds of 8–10 seconds per side.
3. The Bird Dog (posterior chain)
The bird dog trains rotational and anti-rotational stability — the ability of the spine to stay perfectly rigid while the arms and legs move independently. It is deceptively hard to do well.
How to perform it: Start on hands and knees with hands under shoulders, knees under hips, and a completely neutral spine (imagine a full glass of water resting on your low back that must not spill). Brace the core lightly. Slowly extend one arm straight forward and the opposite leg straight back until they are level with your torso — not higher. Hold for 8–10 seconds without letting the spine rotate, dip, or arch. Return to the start position under full control. Switch sides.
Common errors: Reaching the leg too high, which arches the low back. Letting the pelvis tilt to one side as the leg extends. Extending the arm and leg quickly rather than under smooth, deliberate control. All three defeat the point of the exercise, which is anti-motion under limb load, not motion.
Sets and reps: Same reverse pyramid: 6–4–2 holds of 8–10 seconds per side.
Warm-up: the cat-camel
Before the Big 3, McGill teaches a gentle mobility warm-up called the cat-camel. On hands and knees, slowly alternate between a gentle rounding of the back (“cat”) and a gentle arching (“camel”) — 5 or 6 slow cycles. This is a mobility movement, not a stretch. Do not push into pain. Its purpose is to reduce spinal friction and lubricate the segmental joints before the stabilization work begins.
The whole Big 3 program — cat-camel warm-up plus the three exercises with reverse pyramid sets — takes about 8–12 minutes and can be done every morning on the floor of your bedroom or living room. No equipment, no gym.
What most patients get wrong on their first week
- They stretch instead of stabilize. A flexion-intolerant back does not need more forward-bend stretching (knees-to-chest, forward folds, seated hamstring stretches). Those are exactly the loads that provoke the pain generator. Endurance of the stabilizers — not flexibility — is the goal.
- They do too many reps of the wrong quality. Two clean 10-second holds beat twenty sloppy ones. Every rep should look and feel identical to the previous one.
- They hold their breath. Learn to brace and breathe at the same time. If you cannot say a short sentence during a hold, you are bracing too hard.
- They skip the spine hygiene and just do the exercises. The Big 3 alone will not overcome twelve hours a day of flexion-loaded sitting on a soft couch. The hygiene is not optional.
How I fit the McGill framework into a Pravida care plan
For established Pravida patients, the McGill framework is the bridge. It gives you three tangible things during a flare that you did not have before:
- A specific self-portrait of your pain pattern that we can build the office visit around, rather than reconstructing it from scratch during a 45-minute appointment.
- A safe daily program that reduces the odds you make yourself worse in the days between the flare and your visit.
- A shared vocabulary for the conversation. When you and I are both fluent in flexion-intolerant versus extension-intolerant, hip hinge versus lumbar hinge, endurance versus strength, the plan we build together is more precise and, in my experience, more durable.
Where I extend McGill’s work: for patients whose flares are structurally driven — a symptomatic disc, an unstable segment, a facet joint or SI joint that has become a persistent pain generator — the Back Mechanic self-directed plan is a floor, not a ceiling. In the clinic we can add objective functional biomechanics testing on our OxeFit adaptive resistance platform, targeted ultrasound-guided evaluation, and, when appropriate, regenerative options through the CartiNova program for the specific joint or disc driving the pain. The self-directed floor and the clinic ceiling are complementary. Most of my best long-term outcomes are patients who have both.
The honest limits, and where a good clinician still matters
- The Back Mechanic approach is designed for uncomplicated mechanical low back pain. It is not the right first-line tool for radicular pain with progressive neurologic loss, for suspected infection or malignancy, or for pain following significant trauma. Those need imaging and evaluation, not a home program.
- Even for uncomplicated flares, some patients will not respond to a stabilization-first framework and will need a different approach — targeted mobility, specific manual therapy, an epidural steroid injection, or a regenerative procedure. If two to three weeks of disciplined self-management have not moved the needle, that is important clinical information, not a failure.
- Reading a summary of a book is not the same as reading the book. If this framework resonates with you, Back Mechanic itself is the workbook — with photos, decision trees, and progression protocols that go well beyond what I can put in a blog post.
- A home program does not replace an evaluation. If you are in a flare that lasts more than 7–10 days despite the framework above, or you are having recurrent flares more than once a quarter, please come in.
A note on the source material
Everything in this article is my clinical interpretation and summary of the framework Stuart McGill has published in his textbook Low Back Disorders (Human Kinetics), his patient book Back Mechanic, and the peer-reviewed literature spanning three decades from the Waterloo Spine Biomechanics Laboratory. I have deliberately not reproduced photographs, exact protocols, or copyrighted illustrations from his materials. If you find this framework useful, buy the book — the royalties support the ongoing research, and the workbook has clinical detail I have not attempted to reproduce here.
In a flare and not sure what to do next?
If you are an Atlanta-area patient dealing with a back setback that has lasted more than a few days — or you are recovering from a flare and want a plan built around your specific pain pattern — we would rather see you in person. A consultation at Pravida Health includes a physical exam, a targeted functional movement assessment, and, when indicated, ultrasound-guided evaluation of the specific structures driving your pain.
Book a consultationKey sources referenced in this article
- McGill SM. Back Mechanic: The Secrets to a Healthy Spine Your Doctor Isn’t Telling You. Backfitpro Inc., 2015. Patient-directed workbook for self-assessment and home management of low back pain. Available at backfitpro.com.
- McGill SM. Low Back Disorders: Evidence-Based Prevention and Rehabilitation, 3rd ed. Human Kinetics, 2015. The clinician’s textbook — the primary academic source for everything in this article.
- McGill SM. Taking charge of back pain. On Target Publications essay. otpbooks.com/stuart-mcgill-back-pain-self-advocacy. Accessible summary of the pain-trigger self-assessment framework.
- McGill SM, Childs A, Liebenson C. Endurance times for low back stabilization exercises: clinical targets for testing and training from a normal database. Arch Phys Med Rehabil. 1999;80(8):941–944. PubMed 10453772. The original endurance normative data for the McGill flexor, extensor, and side-bridge tests.
- Grenier SG, McGill SM. Quantification of lumbar stability by using two different abdominal activation strategies. Arch Phys Med Rehabil. 2007;88(1):54–62. PubMed 17207675. Foundational paper on abdominal bracing versus hollowing for spinal stability.
- Chaitow L, ed. Muscle Energy Techniques, 4th ed. Churchill Livingstone, 2013 — for background on hip-hinge versus lumbar-hinge patterning that complements McGill’s spine-hygiene principles.